9 Design a Travel Plan
9.1 Introduction
The process of producing and developing a Travel Plan is referred to as ‘designing’ and anyone involved in the production and development of Travel Plans (such as transport consultants, developers and independent businesses) is a “designer”, or “applicant”.
The purpose of this element of the toolkit is to provide designers with a standardised approach to designing Travel Plans; ensuring they are site specific, high quality and fit for purpose.
The main menu of the Design section outlines the process and offers the option to start a new Travel Plan, or access My Travel Plans. Both these options require a Designer log-in, as outlined in Section 3.
9.2 My Travel Plans: For Designers
My Travel Plans is the centralised archive for all Travel Plans you are progressing or have completed with your user account. You can navigate to My Travel Plans from the Design main menu:

Throughout the Design process, you will also be able to access My Travel Plans via the sub-menu navigation at the top of the page:

Within My Travel Plans, all your documents are listed in the main table view. You can sort these by name, authority, client, status or date modified. You can use this table view to navigate to different Travel Plans, or resume progress on existing Travel Plans.
Travel Plans are saved continuously as they are written up and progress through the system. This is highlighted in the ‘Status’ column. Travel Plan statuses include:
- % complete [In Progress]: Indicates Travel Plans that you are currently designing or updating, with the % completion shown in the green bar.
- Draft submitted: Indicates Travel Plans that you have submitted to the planning authority for review and are currently being assessed
- Redraft requested: Indicates Travel Plans that have been reviewed by the planning authority and have been sent back to you to redraft
- Approved: Indicates Travel Plans that have been approved by the planning authority and are awaiting publication into the public domain
- Published: Indicates Travel Plans that have been made public by the planning authority (for guidance on this process, see Section 10.2)
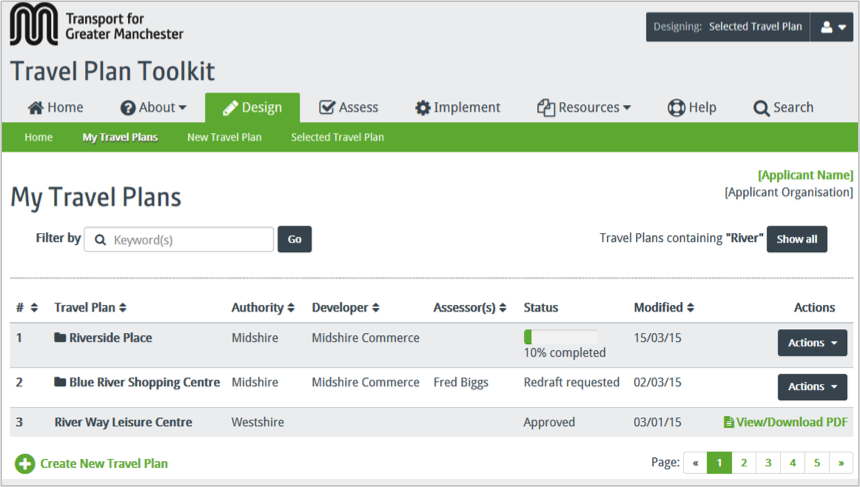
To the right of the main table view is a drop-down menu labelled Actions”. From this menu, you will be able to carry out a number of functions on ‘in progress’ or ‘redraft requested’ documents. These functions will be unavailable once a Travel Plan has been approved by the planning authority, or is undergoing assessment:
- Edit Travel Plan: Edit an existing Travel Plan.
- Submit/Re-submit Travel Plan: Takes you to the final stage of the Design process.
- Display Draft Travel Plan: Links to a printable copy of your Travel Plan
- Email Travel Plan: Attaches PDF copy of your Travel Plan to an email.
- Print Travel Plan: Prints off a paper copy of your Travel Plan.
- Delete Travel Plan: Removes the Travel Plan from the system (only available for Travel Plans that are ‘in progress’).
You can use the final four functions to review or discuss your Travel Plan within your organisation or informally with the planning authority. Once the planning authority has received and assessed your Travel Plan, you will be able to carry out an additional action;
- View Comments: Only available once the planning authority has provided comments on the Travel Plan – allows you to see feedback from the Travel Plan assessors
Approved and published Travel Plans cannot be edited and can only be viewed on the system.
Important note - While it is possible to email and circulate Travel Plans prior to submission, client confidentiality and data sensitivity need to be considered. TfGM are not responsible for Travel Plans that are made public in error or otherwise through the use/misuse of the print/email functions.
You can also create a new Travel Plan by clicking the link at the bottom of the main table:

9.3 Creating new Travel Plans
If you are commencing work on a new Travel Plan, you can either click the link on My Travel Plans, or on the sub-menu bar. You can also start a new Travel Plan from the Design main menu:

When starting a new Travel Plan, you are prompted to provide some basic site information that will form the basis of the document. This includes site name, the developer organisation and district.
If you represent a developer directly, you will be able to select the “My Organisation” button to carry over you user details. Once this information has been supplied, you will be able to start producing your Travel Plan.
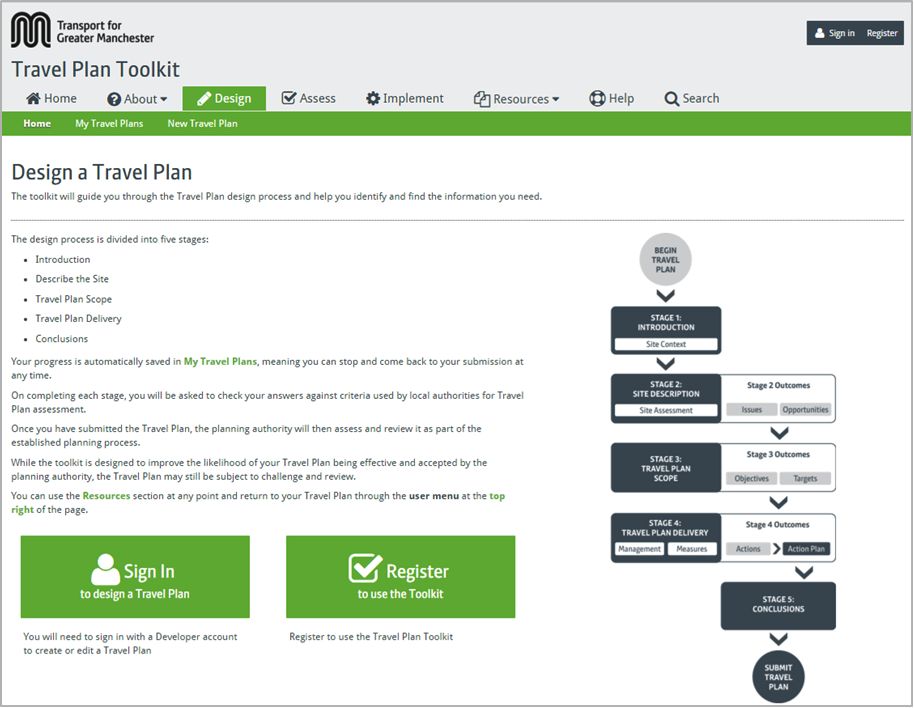
9.4 Designing Travel Plans
Designing a Travel Plan is formed of a five inter-related stages, which must be progressed sequentially in order to produce a finalised document that can be reviewed by the planning authority:
- 1. Introduction: Supply basic information about the site
- 2. Describe the site: Supply more in-depth information about the site
- 3. Travel Plan scope: Identify core objectives and targets for the Travel Plan
- 4. Travel Plan delivery: Identify actions for implementing the Travel Plan
- 5. Conclusions: Summarise the outcomes of the Travel Plan
Each stage is formed of a series of prompts and questions regarding the site. These stages form the basis for navigating through your Travel Plan document.

The Travel Plan navigation bar on the left of the screen allows you to select each stage, bringing up a list of sub-stages beneath. You can navigate sequentially through each of these stages using the green buttons on the design page itself.
The site details you provided at the start of the process are transcribed into the page header on the top left, allowing you to identify which Travel Plan you are currently working on. These details can be edited at any time using the Edit Details button on the top right or the page.
Your progression through the Design process is monitored by the progress bar on the top right of the page. Help Mode and Tooltips are also available throughout the process, as outlined in Section 9.5.
9.5 Accessing Help Mode
This Help document is intended to provide guidance on the main functions of the toolkit system, rather than technical guidance on the delivery of Travel Plans themselves.
Guidance on individual Travel Plan elements is provided via tooltips available on each page. Tooltips are specific to each question within the toolkit and can be accessed by clicking the Help icon:

For designers who are new to the Travel Planning process, it is possible to make all these tooltips visible throughout the process by activating the toolkit’s Help mode.
Help mode is accessible by clicking ‘on’ or ‘off’ on the Help mode switch at the top right of the screen:

If the Help mode is switched off, it is still possible to view individual tooltips by clicking the help icons at any point during the process.
9.6 Checking your Travel Plan
The toolkit provides all the necessary guidance to complete a high-quality Travel Plan. While it cannot guarantee the approval of a Travel Plan by the planning authority, it performs checks at the end of each stage to ensure all the necessary information has been provided.
A number of inputs throughout the toolkit are identified as mandatory by the red star:

While it is possible to progress through the design process without completing these mandatory items, you will be reminded at the end of each stage if any mandatory items have been omitted. These reminders also provide links that allow you to navigate to the relevant missing section.
A final check is performed at the end of the design process, which summarises any missing items across the whole document. You will not be able to submit a Travel Plan to the planning authority via the toolkit system until all mandatory fields have been completed.
If all mandatory fields have been completed, you will be provided with a list of standard checks at the end of each section, based on the assessment questions against which each planning authority will be reviewing your Travel Plan. This also provides links to the relevant sections, allowing you to review key items as the Travel Plan is compiled.
9.7 Viewing and submitting your Travel Plan
You will be able to produce a PDF version of your Travel Plan at any stage of the design process using the ‘View Draft Travel Plan (PDF)’ link on the left of the page. This compiles all of your responses into a PDF document.
At the end of the process, you will be able to submit a draft Travel Plan to the relevant planning authority. The toolkit will automatically send your Travel Plan to the local authority you specified at the start of the process (see Section 9.3). At this point, the toolkit offers you three options:
- Review any mandatory item omissions

- View Draft Travel Plan (PDF)

- Submit Draft Travel Plan
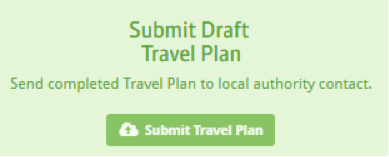
By clicking the Submit option, you will be sending on your Travel Plan to the planning authority for review and it will no longer be editable. The planning authority can then approve the Travel Plan, at which point it progresses through the online system.
Alternatively, the planning authority may request a redraft and provide comments on why the initial submission was not successful. You will be able to revise the Travel Plan in this case, using the planning authority’s comments as guidance.